Sunday 26 May 2013

Home-made Paneer or Cottage Cheese

Don't say Cheese!!!! Scream Paneeeeeeeeeer... It works better when you got to freeze a smile for your beautiful pictures.
Lets be Desi even in such matters you see.

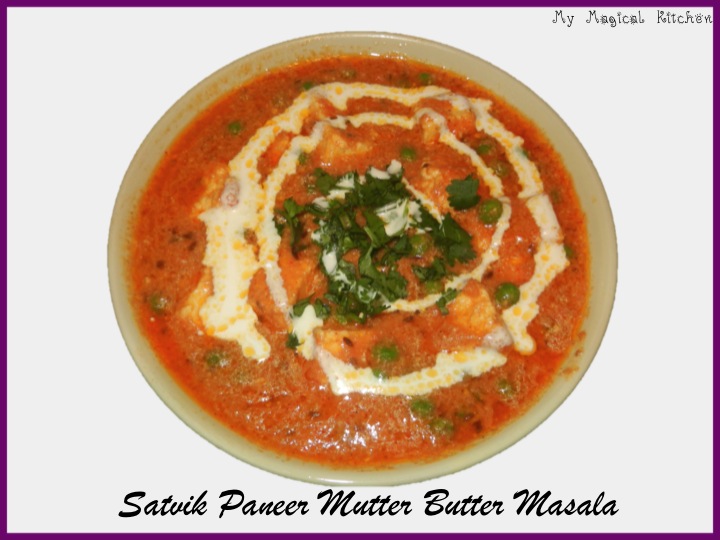
My son Rishi loves Paneer.  Ever since we moved here,it was not easy for me to make his favourite paneer dishes as and when he asked for them. I started making home-made paneer specially for him. I have tried  using paneer maker, but I consider it to be a total waste. I swear by the traditional method.
Vinegar works as the best curdling agent to break the milk and obtain a soft paneer. I have tried with lemon but hate the lemony flavour in the paneer even after multiple washes with water. I have tried with curd too, but I feel it makes the paneer hard.


To get this melt-in-the mouth Delhi like paneer follow these instructions.

Ingredients:

Milk - a liter
White vinegar - 2 tablespoons
Cheese cloth or muslin cloth.

This is all you need to make the best paneer.


Method:

Boil the milk in a thick bottomed vessel.

When the milk is just about to boil add in the 2 tablespoons of vinegar.

When you see all the milk breaking up and separating, switch off.

You have to be quick now. Transfer to a cheese cloth so that the whey water gets separated.

Now pull out the cheese cloth with the paneer tied up in your hands and run it cold water.
This process makes your paneer not become harder.

Squeeze out all the water from the paneer with your hands twisting around the cheese cloth.

Open up the cloth now and shape the paneer into a square with your hands.

Cover the cheesecloth and place a heavy weight over it for an hour or tow. This is very important if you have to get a firm paneer that does not crumble. You can see I kept a vessel of water.

Transfer to refreigerator for a few minutes before you cut them into pieces.

Picture Illustrations


Enjoy!!!!


Thursday 23 May 2013

Satvik Paneer Mutter Butter Masala


Another new day, another beginning, another new recipe…


This is a famous Paneer masala recipe that every housewife in India can whip up in minutes.
I made home-made paneer (remember ? I told you about what I get here). Sometimes when I get lazy, I go to the famous store called ‘Paiz’ here and buy something called ‘Queso Fresa’ (fresh cheese) which looks like paneer and use it in my recipe.

This is a Satvik version of it. Enjoy!!!!

Ingredients :

Paneer/ Cottage Cheese cubed – 2 cups
Tomatoes – 2
Garam Masala – 1 tsp
Coriander powder – 1 tsp
Chilli powder – as per your love for spice
Butter – 1 tbsp
Cream – 2 tbsp
Cumin seeds – 1 tsp
Cashewnuts – 4-5
Ginger – a small bit
Salt – as per taste
Green peas – 1 cup

Method:

Keep the tomatoes in microwave for a few minutes and take out the skin and puree them along with cashew and ginger.
Saute this paste in butter till the oil separates from the tomato and add the garam masala and coriander powder.
Add in a little but of cream,peas, the paneer pieces and let the mixture boil. If it is too thick, add in a little water to it.
Switch off and garnish with cilantro and cream.

Serve with phulkas or rice.


Enjoy!!!!

Wednesday 22 May 2013

Red velvet cake with cream cheese frosting

Can you believe they are eggless???


Ingredients:


Some days here really depress me. Today was one of those days. How do you feel when the world corners you for no reason. I felt that today. That is a long story. There is no value for truth  in this world. How do you feel, when you have friends but you don't have anyone when you need them the most. I felt that today.

Living in a place where the language is different (I consider English as good as my mother tongue), the culture , the food and everything is different is thrilling and also challenging. There are a handful of Indians here and so even conversing with a wall is as good as conversing with them. It is like on BIG joint family living here. Every other Indian knows you here since the community is small. You can rub shoulders with the ambassador of India, get invited to their place for bureaucratic dinners and you feel so special and honored at those times because in other big countries it is impossible where the Indian community is large.

There are some cons living here as well. I know it is stupid, but it will bother you when some of the friends have secret parties without you and update them in the social network. You start to wonder if you are unworthy or not so cool to get their friendships. Though I rub it off and carry on with my work and try to keep myself busy, it bogs me down especially on those days when my husband is not around and I have no one to share.

The 'kriyas' and my meditation help me to an extent to live in this bothersome world.  To add to that, My husband who is not only my friend, but also plays my dear father, brother, boss (you name it, is not here). He is travelling for work and will be back this weekend. 

Today was a day which was so depressing and these beauties pepped my day up. They turned out so well and I packed a few to my son's guitar master who comes home to teach.
  • 1.5 cups of flour
  • 1 tbsp vinegar
  • Sugar - 3/4 cup
  • 1 cup curd
  • 1/2 cup butter
  • 1/2 tsp baking soda
  • 1 tbsp vanilla essence
  • red colour essence - 1tbsp
  • 1 tbsp - cocoa powder

Method:
  • Mix in all the flour,cocoa,baking soda.
  • In another bowl whisk together curd, butter and sugar till creamy. 
  • Add flour,vanilla essence,vinegar and red colour to the above mixture.
  • Fold it well and pour them into cupcake molds
  • Bake the cupcakes for about 20 minutes in 350F

Cream cheese Frosting:
  • Cream cheese - 1/2 cup
  • Icing sugar - 2 cups
  • Whipping Cream - 2 tbsp
  • Vanilla essence - 1 tsp
Beat all the above till smooth and creamy. Frost the cake with swirls after the cake has cooled completely.


The beet red color insides of the cake


Enjoy!!!!

Tuesday 21 May 2013

Light Oat Bread


Super Soft Light Oat Bread


Recipe adapted from All recipes.com. The recipe given was for  making bread with a bread machine.

When I was a little girl I fancied eating bread and jam and carrying them in plastic lunch boxes to school.
Eating bread was considered stylish and plastic lunch boxes were a cool factor then. But my family bought bread only when someone fell sick. I used to long for a day when my mom gives me  bread & jam to school so that my cool factor amidst my peers goes up.
I vividly remember how I compelled my parents and finally packed bread and orange jam to school and eating it so stylishly during the lunch hour.

Buying bread has become a regular at our household in the last five to six years or any other household in India considering the fast-paced life we all have. While my parents still never ever buy bread. I even get ridiculed when they see me feeding bread to my children.  To them bread is still a stick man's food.

Okay!!! I  was super excited when I baked this light oat bread yesterday.  I love focaccia bread and wanted to bake that for a long time. But the process is a little different and I didn't have any fresh herbs to go along with it.  And also as a first timer, I wanted to try something simpler too. I was so happy to see bread baked at home for the first time and had a super soft slice today morning for breakfast with nutella.

Posing Prettily!!!

Light Oat bread

Ingredients:
  • 3 cups all purpose flour
  • 1 cup water
  • 2 tbsp margarine ( I used crisco)
  • 1/2 tsp salt
  • 2 tbsp sugar
  • 1 sachet of Rapid rise yeast
  • 1/2  cup of quick cooking oats
Method:
  • Mix yeast in a little bit of warm water
  • Wait for two - three minutes till the yeast completely dissolves
  • Now knead the flour, yeast, sugar, salt, oats with water and margarine into a very soft dough.
  • Keep the dough covered and wait for an hour for the yeast to react and rise the dough.
  • Knead the raised dough again and transfer to a loaf pan.
  • Wait for 40 minutes or so for the bread to rise again. This is a very important step. Never skip this. Else you will get bread as hard as a stone.
  • Do not disturb the dough after it has risen. 
  • Bake for 30-40 minutes in 350F till the outside is golden brown and crisp.
  • Cool completely before you slice the bread into pieces
This is how I let the dough  raise in the loaf pan
I am sure you will be as excited as I was when you knead the soft dough, watching the chemistry between the yeast and the dough raising, baking the bread and the aroma wafting in your homes. 
My daughter told me 'Mom, don't buy the store bread henceforth. This is so good.'


Enjoy !!!!!

Friday 17 May 2013

Raita de Pepino - Cucumber Raita

I had this brainwave sometime yesterday to put in recipes of Indian cuisine that the Guatemalan friends will like.?

When the cooking is not elaborate, anyone will make an effort to try it.
Let me see how far this works out.

Raita de Pepino or Cucumber Raita is a yogurt based dish that is served as an accompaniment with spicy dishes.
It is generally served with rice or Indian breads.

You can make 'Raita de pepino' to accompany tortillas or just as an additional dish on the table when you have your lunch or dinner.
Spread a little bit of them in the nachos or you could roll them up in between tortillas or eat with rice.
Your choice!!!

And you don't even have to turn on your stove for this recipe.  A keeper of a recipe indeed.

Pls. excuse my Spanish. I have done my best effort to draft the recipe in Spanish for you folks. Volunteers welcome for correction.


Raita de Pepino (para 4 personas)
Prep : 10 minutos

Ingredientes:
  • 2 vasos de yogurt natural  (sin azucar marca Glad, puede comprar en La Torre o Pais)
  • 2 pepinos sin semillas o quitarle las semillas
  • 1/2 tsp sal
  • 1/4 tsp azucar
  • 1 cucharada de cilantro fresco y menta 
Metodo:
  • quitarle las semillas de pepino y cortar los pepinos en pequeños cubitos.
  • Combinar con el yogurt, sal y azucar
  • Mezclar bien
  • Servir Bien con cilantro y menta.
Buen Provecho!!!!


Recipe in English (For 4 persons)
Prep : 10 minutes or lesser

Ingredients:
  • 2 cups of yogurt natural ( buy the Glad brand in paiz or La Torre)
  • 2 cucumbers 
  • 1/2 tsp salt as per taste
  • 1/4 tsp sugar
  • a few leaves of mint and cilantro
Method:
  • Take out the seeds of cucumber and cut them into very fine cubes.
  • Mix the cucumber in yogurt, salt and sugar
  • Serve chilled decorated with cilantro and mint. 
Enjoy!!!!!


Tips :
You can try this 'Raita' with tomato, boiled corn and beet-root. Combinations are endless.


Thursday 16 May 2013

Idly Milagai Podi / Chutney Podi


If you are a south Indian and happen to stop by this post, your mind-voice might tell you 'What?? This is a different recipe. Phew!!! I can make my own Molaga podi or 'My mom's recipe is the Best'

True that. Every south Indian home has their own 'Molaga podi' recipe. So much so that there are differences of the recipe in the same family.

Even the oil used to mix the podi is different in different homes. In my mom's house, we use sesame oil to mix in the podi, but in my mother-in-law's house we use 'chuttennai' which is re-used coconut oil to mix in the podi.
I personally don't prefer the bitter taste of sesame oil and prefer refined vegetable oil.

Every Molaga Podi has a distinct flavour and taste of its own.
I have never made 'molaga podi' on my own. My mom always sends them to me and if that does get over, I buy the instant packs from the stores. But they never match the taste even closely to the home-made ones.

This is my mom's original 'molagapodi' recipe. I can eat it with not only Idlies or Dosas, even Adai, Chapathi or even plain rice.

I sometimes sprinkle a few spoons of this powder on my 'Pasta'  and eat it much to the bewilderment of my BH (Better half, now that I have started blogging, have to learn to thrown in a few popular blogging terms).

I am so addicted to this 'podi' and my children too, that we finish mom's supply so quickly and have nothing but the chill flakes.

I remember my mom making this podi and packing it to all her relatives and friends.

Okay this recipe is for the south Indians who don't like their household recipe or who don't get their yearly supply of molaga podi from their moms.
I am sure no one else will even try making molaga podi, as their knowledge is only limited to chutney and sambar accompaniments for Dosa/Idli as most hotels don't serve them.


Ingredients :

1/2 a cup of Chana dal
1/2 a cup of Urad Dal
Red Chilli - a handful
White Sesame seeds - 2 or three tbsp
salt - as per taste
Hing or Perungayam -  a pinch (people who eat pranic diet can avoid this totally)


Method:

In a wide open pan, sauté all the dals and sesame separately with very little oil till golden brown.
Be careful, they will turn to an ugly brown in a wink.

Then slightly fry the red chillies. Allow all of them to cool.

Grind them in a mixie. My mom doesn't grind them very fine and not too coarse. She grinds in such way that the powder looks fine but when you eat, the tiny bits of dal make the experience of eating molaga podi enjoyable.

The small bit of the dal makes the molaga podi crunchy and enhances the taste when mixed in oil.


Enjoy!!!!!


Wednesday 15 May 2013

Threatening Copyrights


You know I have been going through some of the famous food blogs these days. I have also signed up for some food groups in the social network.

One thing that caught my attention was that bloggers are so serious about copyright issues.

All of them seem to write a very threatening note about copyright. It is funny even to read them.

Is there anything that we have created on our own? Anything, Anything at all.. ask yourself.. 

There is nothing...  

How could a recipe be an original creation of someone? The ingredients that go into it are whose creation?   Should a farmer take patents for that, or the person who discovered cream cheese or the one who discovered various methods of cooking or the one who invented fire which is a basic necessity for cooking ask you to quote their names in credits?

Ask yourself that.. You will be humbled.

Ask a true creator, he will humbly say 'No' , I didn't do this magic. My hands were blessed to do this magic.

A recipe given to hundred people will churn out hundred different tastes and flavors.

On this note I have to accept that I always give credit to the blogger who has inspired me to make a recipe.  He/She might have taken the recipe from some other source and it goes on.

There is nothing that we have really done on our own. Fellow bloggers, please don't take these issues so seriously. Let them live and don't make noise out of these. If you cook with all the love and care it is going to show in the work you do. So chill...

Till then.. Enjoy your meal with all the gratitude!!!!


Tuesday 14 May 2013

Carrot Cake with Cream Cheese Frosting

Carrot cakes and Cream cheese frosting -  There is nothing much we need to do to make this cake look good. Carrot by itself adds to the texture and flavor of the cake and when adorned with cream cheese, it only scores high in visual appeal. An incredible short-eat for snack boxes to school or office. I baked a batch of these when we visited a friend's house for dinner. When it comes to gifting food, nothing like home-made goodies made with all the love and care.


Ingredients:
1 1/4 cups of All purpose flour
1/2 a cup of sugar
1/4 cup of brown sugar
1 tsp baking soda
2 tsp cinnamon powder
1/2 tsp of salt
1/4 tsp of nutmeg
3/4 cup of vegetable oil
1/2 cup natural yogurt or 2 tbsps of Flax seed powder mixed in 6tbsp of water
1 tbsp vanilla extract
1 tsp of grated orange zest
1.5 cups of shredded carrots (I love to shred them super thin)
1/2  a cup of raisins

For the frosting:
a little less than half a cup of cream cheese
1/4 cup of unsalted butter
2 cups of powdered sugar
1 tbsp of water
1 tsp of vanilla
1/4 tsp ground cinnamon

Method:
  • Preheat oven to 350F.
  • Line the muffin tray with cupcake liners and keep them ready
  • In a bowl mix in the carrots, raisins and flour
  • Mix in the other ingredients and incorporate them into the batter well.
  • Pour the batter into the cupcake moulds and bake for 15 - 20 minutes till done.
  • Take them out and cool completely before you frost them.
  • For the frosting, mix in all the ingredients listed till you get a thick spreadable consistency,
  • Decorate the cupcakes with the yummy cream cheese frosting and wait for it to rest a while.


Super moist cupcakes waiting to be adorned
So... Good!!!!


Recipe Credits:
I have adapted this recipe from Laura's Kitchen.  We love to watch her shows just for her easy- to-make-no-hassle recipes. 

Saturday 11 May 2013

Besan Puda

Besan Puda makes a quick breakfast or a lunch. It is very filling and healthy too.
And you can make this super quick on a day when you are really busy and need a filling breakfast recipe.


Ingredients:

1) a tsp of cumin
2) salt to taste
3) shredded carrots, zuchini and cauliflower.
4) two cups of besan flour
5) water to mix
6) chopped green chillies and cilantro

Method:

Mix in all the ingredients to the consistency of a pancake batter.
In a non stick pan pour the mixture into thick- round pancakes.
Smear oil and cook on both sides.
Serve besan puda hot with tomato chutney.


Recipe adapted from Manjula's kitchen:


Friday 10 May 2013

Oatmeal - Coconut cookies

I learnt this recipe from the school cook. Normally all the other cookies he would bake contain eggs. So whenever he makes these he would share some with me and he was kind enough to write down this recipe for me.
Oatmeal - Coconut cookies

Ingredients:
  1. 1/2 cup  butter
  2. 1/2 cup vegetable shortening (crisco)
  3. 1 cup castor sugar
  4. 1 cup brown sugar
  5. 1 tbsp vanilla essence
  6. 2 cups flour
  7. 2 cups oatmeal
  8. 1 tsp baking soda
  9. 1 tsp baking powder
  10. half a cup desiccated coconut
Method:
Mix the ingredients from 1-5 till smooth and creamy and set it aside.
In another bowl mix ingredients 5-9 and then mix it with the sugar butter mixture.
Knead them well till a cookie dough consistency is obtained.
Make small cookies and spread them in a baking sheet.
Bake these for 15 minutes till golden brown.


The aroma of vanilla,coconut wafting in the air... to die for

Ahem.. trying my hand on food photography


Thursday 2 May 2013

Chocolate Cake with rich Ganache frosting


I am a Isha Yoga meditator. While I participated in one of the Silence program called Samyama, the program required us to follow a non-dairy diet for almost sixty days. The diet was no chili in any form and also no dairy. I would crave for something sweet as a dessert when we dine out.  As it is there aren't any options for vegetarians in Guatemala and looking out for vegan cakes is madness. This cake used to be a regular at our household (without the ganache frosting of course) during those days.
I am trying hard to remember from where I found this recipe. A big 'thank-you' to the kind hearted blogger who shared this recipe. Follow this recipe to the T and check the cake in the oven after 20 minutes. The middle part should be firm and not sink back when pressed. There is one more technique I learnt from the school cook. Once you take out the cake from the oven, rock it like a baby, with the oven mitts put on in your hand obviously , else you are going to burn your hands bad. This way the edges become loose And also the cake cools faster before you turn into the wire rack.


Ingredients :
3 cups all purpose flour
1 3/4 cup sugar (make it 2 cups if you plan not to frost the cake)
6tbsp or 1/2 a cup of Hershey's cocoa powder
2 tsp baking soda
a pinch of salt
2 cups of hot water
3/4 up of vegetable oil
2 tbsp white vinegar
1 tbsp vanilla extract

Method:
Sieve Flour, cocoa powder, salt and baking soda in a bowl
Mix hot water with sugar in another bowl and whisk till the sugar is completely dissolved.
Add it to the vinegar, vanilla extract and vegetable oil.
Add this liquid mixture to the flour mixture and fold gently.
Grease and flour two round 6 inch cake tins and pour the mixture equally.
Bake in 350F for 25 minutes till done in a pre-heated oven.
Let the cake cool completely in a wire rack.

Now comes the joyful part.. Frosting the cake with rich ganache.

Frosting:

  • Two cups of Ghirardelli semi-sweet chocolate chips.
  • A cup of heavy cream.
Mix the chocolate chips and heavy cream. Heat them on a sauce pan on very slow heat. 
Double boiling also works best.
Do this till you see a smooth and glossy chocolatey mixture.
Turn off heat when the mixture is thin.
Let it cool for about an hour.  Now you can see that the ganache mixture has firmed up.
In a handheld mixture beat on high speed till creamy,
Frost prepared ganache on cake immediately.


Related Posts Plugin for WordPress, Blogger...

Translate